-
week13
- 27 August
Google Summer of Code 2017 final report
This post summarizes the work I did during Google Summer of Code 2017 with the MovingBlocks organization.
The final product is a web and mobile administration interface for Terasology servers; the original idea comes from this issue.Usage instructions
Here are basic usage instructions. A video showing the process is also available here.Server
The most straightforward way to set up a Terasology server with FacadeServer, the project I worked on for GSoC, is to use the Docker image. Here is a quick step-by-step guide:- Install Docker (if it’s not already installed on the machine you want to use). From this page there are instructions for the various operating systems and cloud computing platforms.
- In your shell, execute
docker pull gianlucanitti/terasologyfacadeserver. This will download the binary image and may take some time. - When the
docker pullcommand returns, you can start the server withdocker run -p 8080:8080 -p 25777:25777 -d gianlucanitti/terasologyfacadeserver. A couple of notes:- The two
-parguments expose the network ports for the web server (8080) and for the Terasology game server (25777) to the host machine (and the external world, if allowed by your firewall). Without them, it wouldn’t be possible to connect to the server. - The
-dswitch is optional. If present, the server will start detached from the shell so that you can leave the shell/terminal without stopping it.
- The two
- If you used the
-dswitch, the command will pring a long string which is the ID of the started Docker container and return. You can then view the server’s log withdocker logs <container-id>or stop it withdocker stop <container-id>, replacing<containder-id>with the string printed by thedocker runcommand. If you started without the-dswitch, the server’s log will be printed to the standard output, and the server can be stopped withCTRL+C.
Note that the Docker image is packaged without any additional module, so no default game is started and you cannot directly connect to the server using the regular game client; you first need to connect to it using the web interface, install the modules you want to use and start a game.
Alternatively, you can run it from a development environment. In this case, you need to clone the main Terasology repository, then obtain FacadeServer’s source by running./gradlew fetchFacadeServerand switching to thedevelopbranch of FacadeServer by runningcd facades/Server && git checkout develop && cd ../... At this point, you can use./gradlew jar facades:Server:runto compile everything and start the server.
Client
The latest (at the time of GSoC 2017 ending) version of the client is hosted at http://utility.terasology.org:8000/. Once you have a running server, you can replace “localhost” in the “Server WebSocket address” field in the web interface with your server’s IP address to connect to it (not necessary if the server is running on the same machine you are using to browse the web interace).
Alternatively, you can follow the instructions in the client’s README to build from source the mobile application or your local instance of the web application.Code
The code I wrote spans across these repositories:MovingBlocks/FacadeServer
I sent the following Pull Requests to MovingBlocks/FacadeServer:- Run the game engine (merged)
- Authentication management (merged)
- Resource management (merged)
- Games resource (merged)
- Modules install resource (merged)
- Add resources to obtain or modify server’s MOTD and port (merged)
- Manage administrative permissions (merged)
- REST methods (open)
MovingBlocks/Terasology
I submitted this pull request to the main Terasology repository, which contains changes which I needed to implement parts of FacadeServer: Refactor module installation code to decouple UI (SelectModulesScreen) from logic.gianluca-nitti/FacadeServer-frontend
This repository on my personal GitHub account contain the front-end client application: https://github.com/gianluca-nitti/FacadeServer-frontend.Other
- The commits after
1633d18on themasterbranch of my terasology-key-server repository, which is a tool to help users in carrying their Terasology client identity certificates across various clients (a running instance is availavble here), has been done during the GSoC work period to adapt it to be used in the web and mobile application too (in addition to the Terasology game client). - I made this very small pull request to the MovingBlocks/meta-server respository.
Other relevant links
Demonstrational video
Thanks and credits
Huge thanks go to my mentors Martin Steiger and Tobias Nett, the MovingBlocks organization admin Rasmus Praestholm and the whole MovingBlocks community for supporting my work and to Google for organizing GSoC. -
week12
- 20 August
Improved mobile client user experience and implemented a more RESTful-compliant HTTP API on the server
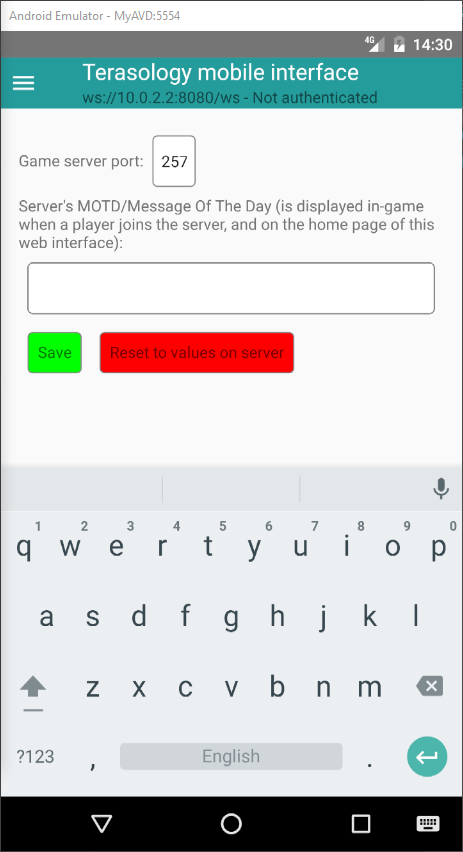
During the first part of the last week I focused on improving the mobile user interface of the ReactXP-based client for FacadeServer. In fact, despite using a cross-platform framework, I noticed that the user interface I made during the past weeks and mainly tested on desktop browsers, was becoming hard to navigate on a mobile device, especially in portrait orientation. More specifically, the header and the menu on the left, with the navigation buttons, were taking up too much space from the main content panel. So, on the mobile version I made the header smaller and implemented a show/hide button for the navigation menu; here is a screenshot of the mobile application in the server settings tab:
By touching the button on the left side of the header, the menu pops up and you can switch to the other screens such as the console, the savegame list, etc.; the login button has also been moved in the menu.
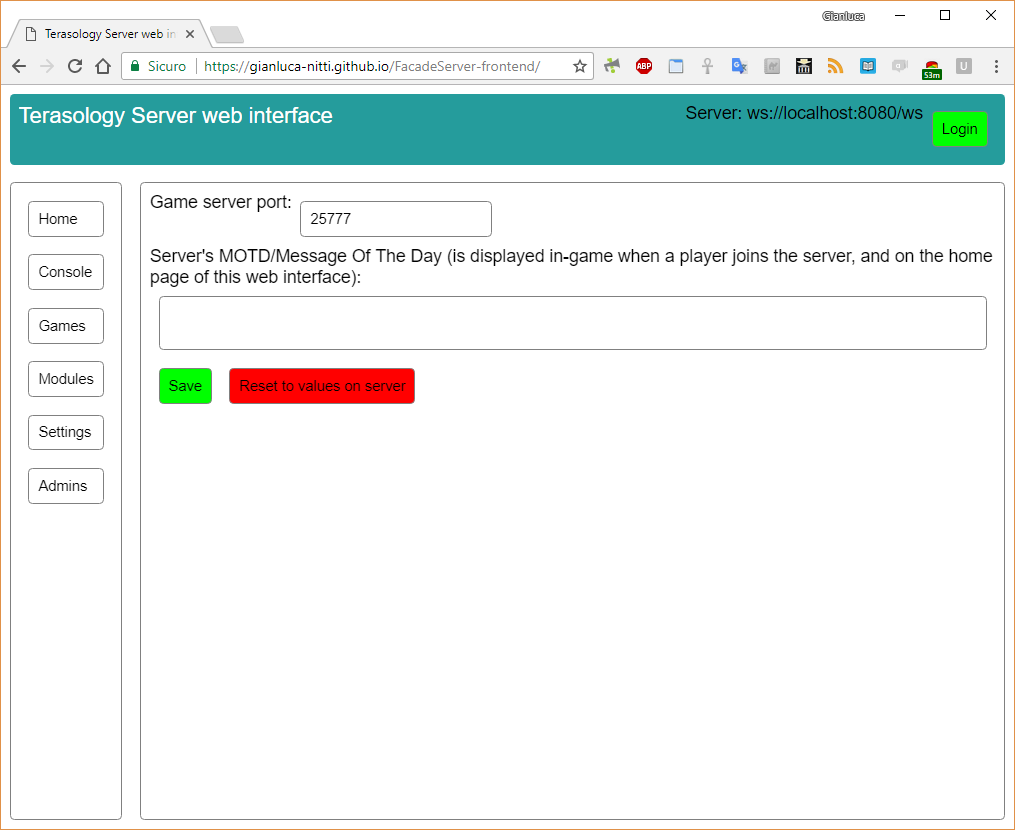
The web version, instead, preserves the usual look; here is a screenshot of the same tab for comparison:
\ This is still the same application, built from the same codebase; only small layout-related sources are platform-specific, and at build time the correct ones are chosen according to the current target (web or React Native). In fact, while these changes may look very quick, some time was required to set up the different build pipelines for the two targets; to choose the correct platform-specific sources to include, the webpack alias feature is used on the web side, and babel-plugin-module-alias is used on the mobile side.
Later in the week, I moved to the server side with some considerations in mind: the protocol abstraction layer developed in the first GSoC weeks, which allows to easily access the various server resources both via HTTP and via WebSocket works fine, however the HTTP version isn’t compliant with any well-known API standard and a bit cumbersome to work with. For example, to delete over HTTP a savegame from a server running the current FacadeServer develop branch, you need to send aPOST /resources/gamesrequest with the JSON payload{"type": "Delete", "data": {"gameName": "name-of-savegame-to-delete"}}, which is a shame because this resource is basically a collection of games and the supported methods map quite well to REST methods; if I had designed the server better, the action described above could be performed with aDELETE /resources/games/name-of-savegame-to-deleterequest without payload; creating a game would be aPOST /resources/gameswith the name, module list and other properties in the payload; renaming a game would be aPATCH /resources/games/name-of-savegame-to-renamewith the new name in the payload, and so on.
So I went ahead and tried to redesign the resource management code to make the HTTP interface RESTful and at the same time keep the support for WebSocket and push notifications (i.e. the server notifies the WebSocket client when a resource changes). I’m working on the rest-methods branch and it’s almost done (needs some minor improvements and more unit tests; I’d say it’s about 85% done, and it took me about 3 days). Then, some changes on the client are needed too. Here is a diagram of the currently supported requests and some possible additions:- GET /onlinePlayers -> get online player list
- POST /console -> run command specified in payload
- GET /games -> get savegame list
- GET /games/{name} -> get details about a single game
- POST /games -> create new game (properties specified in payload)
- PATCH /games/{name} -> rename game with new name specified in payload (possible addition: change modules)
- DELETE /games/{name} -> delete game
- POST /games/{name}/backup -> create a backup
- GET /engineState -> get the engine state
- PUT /engineState -> switch to state (payload contains new state, can be IDLE or LOADING, and game name if necessary)
- GET /modules/available -> get list of installed modules
- GET /modules/available/{name} -> get details about single module
- DELETE /modules/available/{name} -> uninstall specific module (currently not implemented; what about dependencies?)
- GET /modules/installer -> get module installer status message
- PUT /modules/installer -> start installing a set of modules specified as payload
- GET /worldGenerators -> get list of available world generators
- GET /config/serverPort -> get listen port
- PUT /config/serverPort -> change listen port
- GET /config/MOTD -> get MOTD
- PUT /config/MOTD -> change MOTD
- GET /serverAdmins -> get list of admins
- POST /serverAdmins/{clientId} -> add client ID to the admin list
- DELETE /serverAdmins/{clientId} -> delete client ID from admin list
/resources; the other HTTP root endpoints to perform authentication (/auth) and to query events (/events) are left unchanged. The event system (which is currently used by the console resource only) is unchanged too; you can’tGET /resources/consoleto read messages, but you need to query the global event queue at/events, though local event queues (e.g./resources/{resourceName}/events) could be an idea for future developments.
The same requests can be made over a WebSocket connection; a client-to-server message looks like this:{"messageType": "RESOURCE_REQUEST", "data": {"resourcePath": ["config", "MOTD"], "method": "POST", "data": "This is a new server MOTD!"}}, while server-to-client messages (which can be either responses to requests, or notifications that a resource has changed or emitted an event) have this structure:{"messageType": "ACTION_RESULT", "resourcePath": ["config", "MOTD"], "data": {"status": "OK", "data": null}}(this example is a possible response of the server to the POST request above; in case, for example, of a GET request, the innerdatafield wouldn’t be null but would include the requested data).
That said, it may be too late to include a patch of this size in the GSoC; I’ll do the final changes and open the pull request as soon as the currently open one is reviewed (therest-methodsbranch is based on the branch of that PR) and I’m not sure if there is time to review it before the GSoC submission deadline, given that the diff is currently 1587 lines added and 1242 lines removed. Anyway, the end user UX with the ReactXP-based client wouldn’t change much; what would improve if this branch is merged is, in my opinion, the further maintainability of FacadeServer’s codebase and the ease of developing alternative clients. -
week11
- 13 August
Completed admin permission management, added automatic backups to identity storage server, and added a new feature to the frontend
Another GSoC week has just ended. In the previous post on this blog, I described two features I had added to FacadeServer (and it’s web/mobile client): module installation and ability to manipulate settings (server port and MOTD). Both these features, along with the previously developed one which allows to create, rename, backup and delete the various savegames on the server, should only be accessed by a restricted set of users which are the administrators of the server; also, they allow to manipulate server-wide data (installed modules, configuration, list of games), while the existing permission management system in the Terasology engine is designed to manage permissions local to a single savegame (i.e. each savegame directory contain files with information about whether a certain user can use cheats, kick players, etc in that specific game).
Thus, during the first part of this week I set up the code for server-wide administration permission management. Here are the key points of this addition:- The list of users allowed to perform admin-level operations consist in a list of the client IDs of said users, and is stored in a
serverAdmins.jsonfile in the server data directory (next to theconfig.cfgconfiguration file). - When a server is started for the first time (i.e. the data directory specified on the command line does not exist or is empty, so it’s created and the server configuration is initialized to the default values), the administrator list will be empty. Also, since there are no savegames, no regular client ever connected, so no client identities have been generated at all. When the list is empty, everyone which can connect to the server using the HTTP/WebSocket API also has access to the admin-restricted features (there would be no way to identify a client in this initial phase).
- After starting a new server, it’s recommended to lock the administrative access to the trusted user(s); this can be done by creating a game from the web interface and starting it, then connecting to the server using the regular game client. When the server is in the “empty admin list, public access” phase, in fact, the first user which connects will be added to the admin list. Since the list becomes non-empty, this means that from this moment the access to the admin-only functionalities is no longer public, but restricted to the user which joined the server for the first time. Said user then needs to authenticate to the web interface (by pasting the game client’s configuration file or using an identity storage server, as described in older posts on this site) to access these features (so, for example, to add other games, installing other modules, etc.).
- An authenticated user whose ID is in the administrator list can then add other users to the list, to grant them access to the restricted features, or remove them to revoke the permission. Using the proper panel in the web/mobile client, adding a user to the admin list can be done either by manually pasting their client ID in the interface, or, if they are online, by picking their user name from a list.
- If the admin list becomes empty again (which can only happen if an admin removes everyone including himself from it, or if the
serverAdmins.jsonfile is deleted and the server process restarted), the access to the admin-only features becomes public again, until a player joins through the regular game client as described above.
admin-verificationbranch.
I then moved back to the identity storage service code, to add support for automated backups. Now, when installed using docker, a cron job automatically takes snapshots of the database every day; old backups are deleted after 7 days (meaning you have access to the database dump of every day at midnight in the last week). The backup files are SQL dumps and are stored in a directory mounted on the host machine (using the docker volumes feature).
The new code (mostly shell scripts and some changes to the Dockerfiles) is available in the identity storage service repository; I tagged the latest commit after these changes as a new version, v1.1. More information about how to install the service on your server are available in the repository’s README file.
In the final part of the week, I added a feature to the web/mobile client: a “Remember Me”-like checkbox for the authentication process (it was already present in the UI as I planned to add this feature before, but wasn’t working). When authenticating to a server, if you select this checkbox and the authentication succeeds, the public and private certificates are stored locally (in the browser’s localStorage if using the web-based version or in a proper place in the device’s memory if using the mobile application version) and the next time you connect to the same server you will be prompted if you want to authenticate using the stored credentials; if you choose Yes and the credentials are still valid, you will be automatically authenticated without needing to enter other data.
Adding this feature also required a quite big refactoring of the client-side authentication code, which was getting less and less readable, but it should be better now. Everything is available in the usual repository and the web version is deployed on GitHub pages. -
week10
- 6 August
Completed module installation from web interface, added access to two configuration entries, and did some improvements on the identity storage server
As the title says, this week’s update spans on multiple topics, like last week’s one.
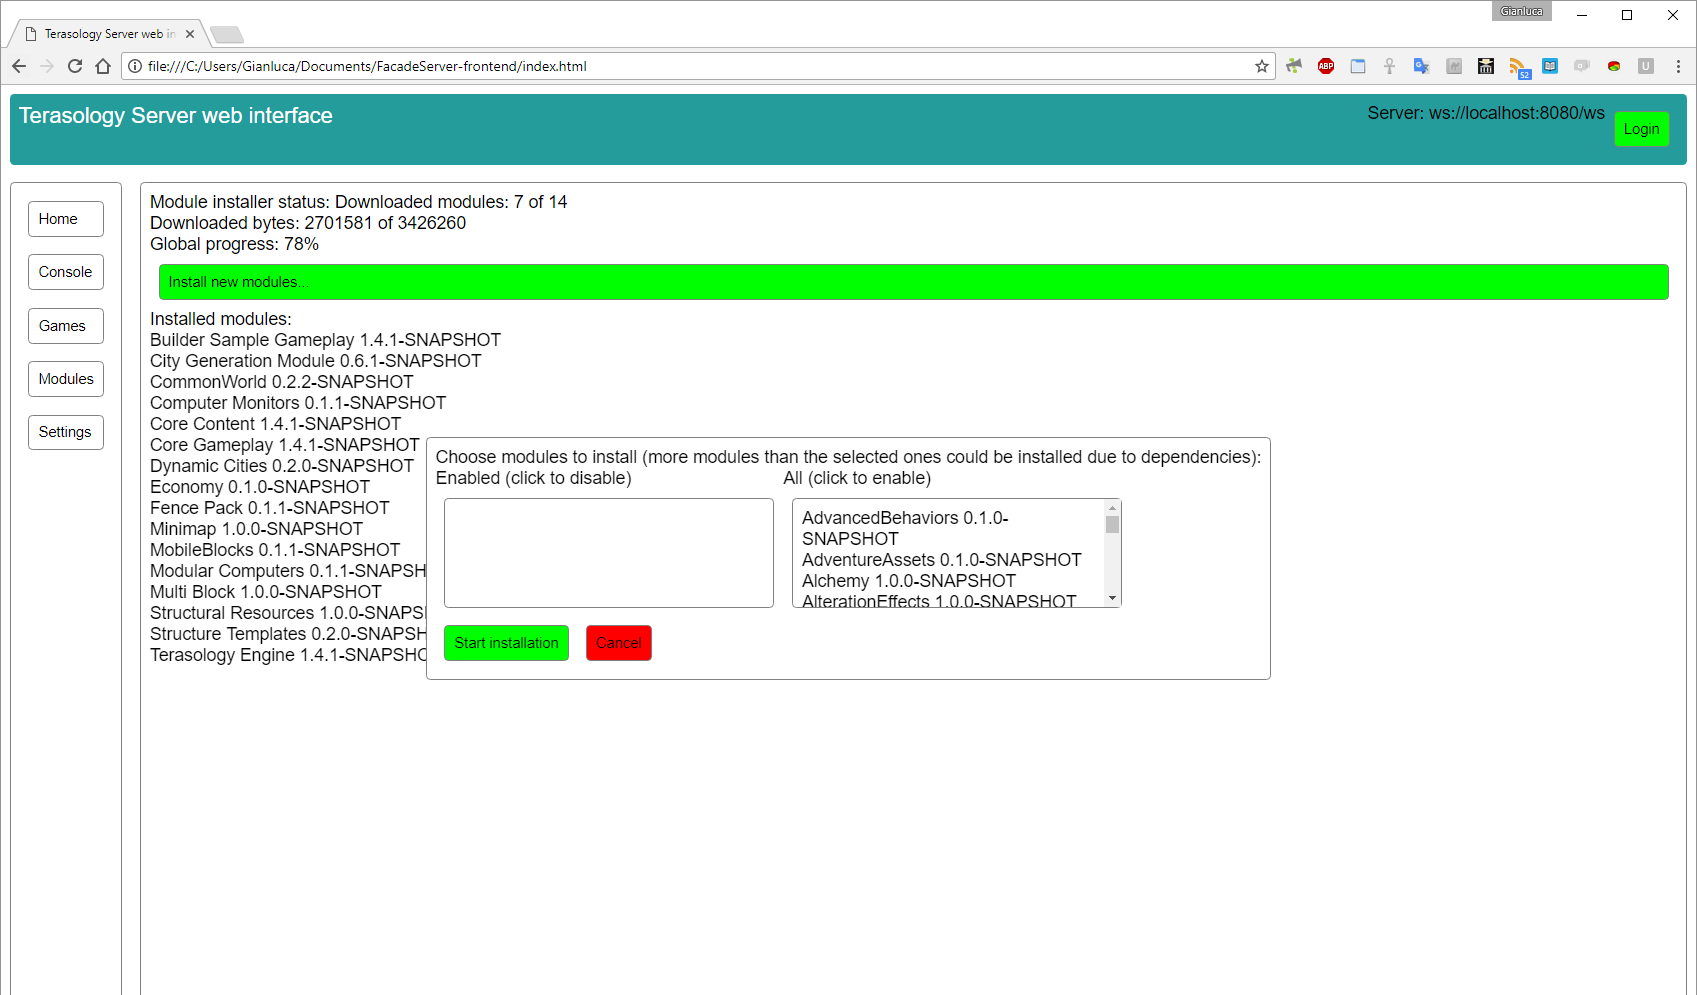
After doing some final improvements to the quite big FacadeServer’s pull request #4, which now has been merged, I completed the support in the server and in the client to allow server administrators to install modules (in the previous posts I explained what I changed in the Terasology Engine repository to make this feature possible, code which is in Engine Pull Request #3028). As usual, the client code is in its repository and deployed to GitHub pages, and the server code is in a pull request (#5). Here is a screenshot of the user interface:
Before taking this screenshot, a module installation was started - so that you can see the progress reporting - then the “install new modules” dialog has been reopened. Choosing some modules and clicking Start installation now would queue the new modules for download after the current ones; at the the current state of the application, however, this wouldn’t be reported in any way, i.e. it won’t increase the number 14 in the “Downloaded modules: 7 of 14” message. After finishing the previous install transaction (i.e. reaching “Downloaded 14 of 14”), it would change to the new “Downloaded modules: 0 of 3” assuming, for example, that you chose one module with two dependencies.
I then moved to the identity storage server code. As I said in the previous post, the service needs to support HTTPS to be used as an authentication method from the FacadeServer client instance hosted at GitHub pages, since it’s served over HTTPS as well and trying to make a plain HTTP request from a web page served over HTTPS results in a Mixed Content error. So I added support for loading HTTPS certificates in the storage server application, and in the meantime improved the installation method which now is based on Docker and docker-compose. More information is available in the README file. At the moment no HTTPS-secured instance is deployed, but I’ll see if I can avoid the Mixed Content error by using a self-signed certificate on the instance hosted on my DigitalOcean droplet.
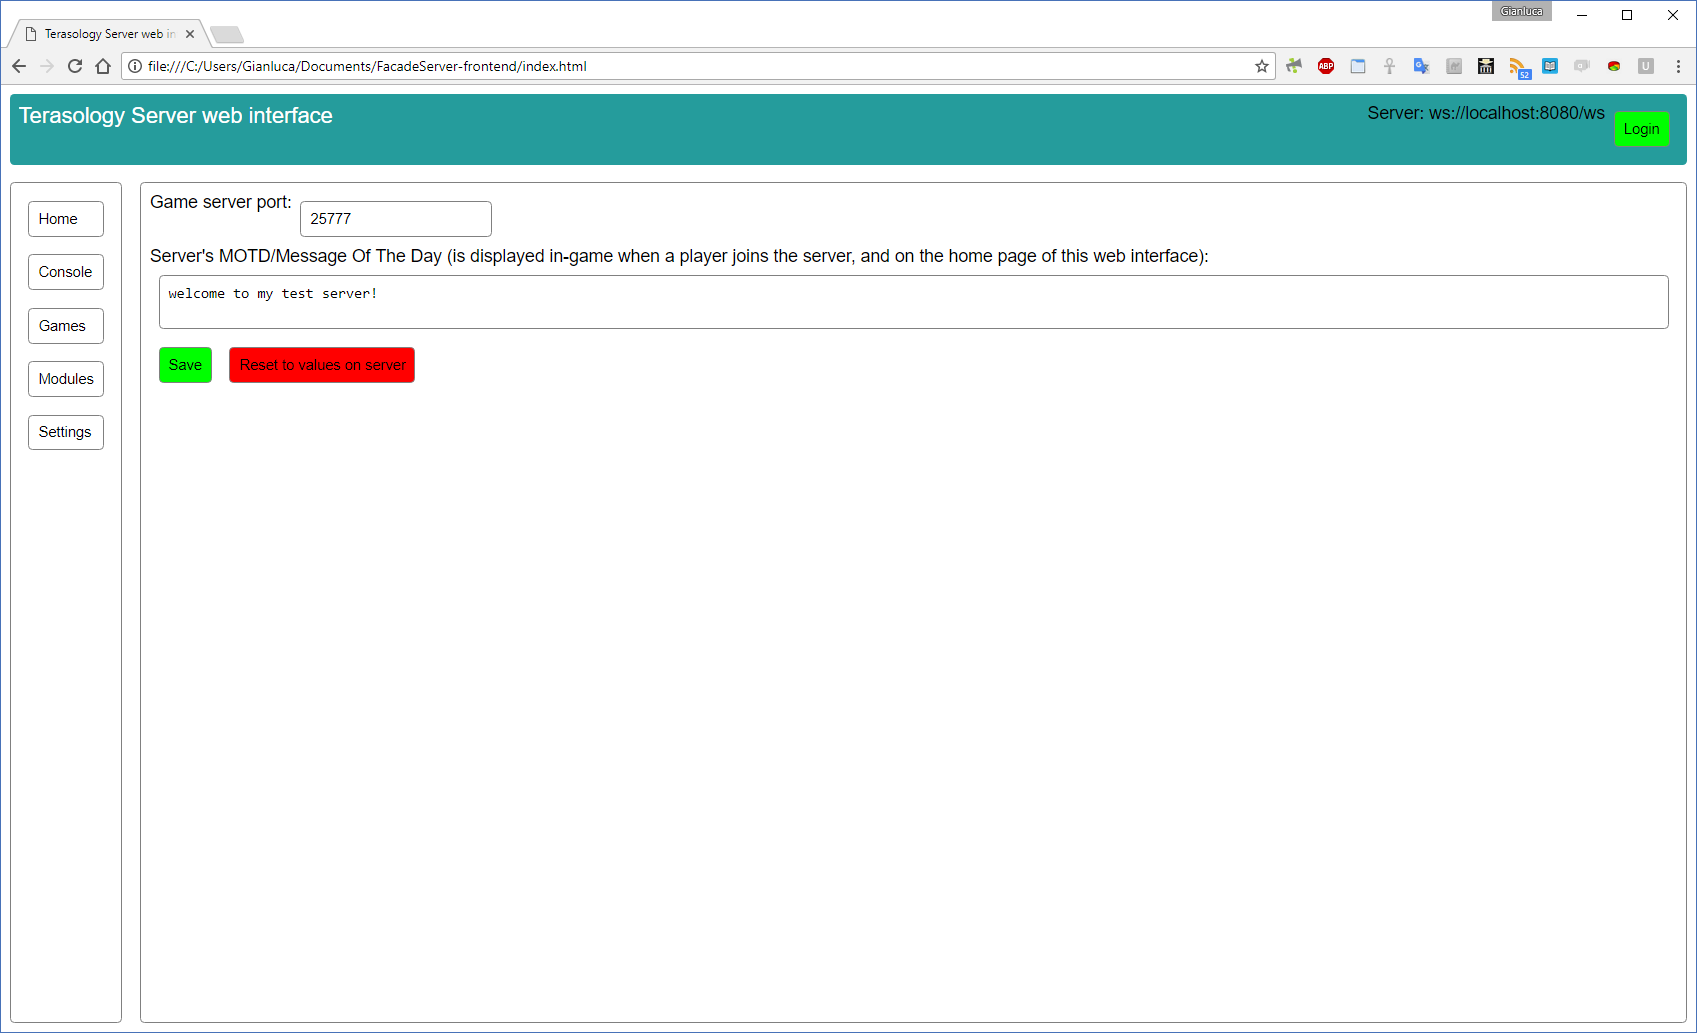
At the end of the week I added additional classes to FacadeServer to provide access to two entries of the engine configuration - the only ones I could find which are relevant to an headless server, at the moment: the network port on which the server listens for connections, and the Message Of The Day which is shown when a client joins the server. This code is in another small pull request (#6). The read access to this information is public (i.e. accessible to everyone which connects to the server via HTTP or WebSocket), while the write access is restricted to authenticated server administrators. I also upgraded the client with proper UI components to provide access to this feature. Here is a screenshot of the settings page:
Clicking the “Save settings” button will apply the changes if you are authenticated and your client ID is in the server admin list (otherwise, you would get an error message); the new Message Of The Day should be immediately visible to new clients which join the server, while if you change the port number and a game is running you need to stop and restart it (which will obviously disconnect all the connected clients; users would need to update the port number to the new value in their client to be able to reconnect). -
week9
- 30 July
Completed login via identity storage service and prepared the “module installation” feature
As you can see from the title, the two topics covered in this blog update are quite different and probably two separate posts would have been better, however I didn’t found the time to write one in the middle of the week - I preferred focusing on making progress in the project - so I’ll summarize everything here.
At the end of last week, I said I was working on allowing the user to login to the web/mobile client through the identity storage service; this feature is now completed. There is still a little logistic problem - GitHub pages, where the web client is deployed (link), serves the files over HTTPS, but I haven’t set up an SSL certificate for the identity storage service instance running on my server. Browsers by default don’t allow a page loaded over HTTPS to make plain HTTP requests to another server, so this feature does not work with the actual combination of deployed instances (you will see a “mixed content” error in the browser console if you try); it happily works if you set up the client locally as described in it’s readme, and this doesn’t affect the Android application. MovingBlocks admins offered to host an instance of the identity storage on their servers, so maybe we could setup the certificate there, or alternatively for now just serve the client in plain HTTP.
A small side note about the client: the ReactXP (the library powering it) developers kindly fixed all the issues I reported, so the user experience is more stable now (modal dialogs now work on Android too, and the visual style is consistent between the browser and the mobile version).
In the second part of the week, I worked on providing a way to allow server administrators to install modules from the web interface (at the moment, you can only create new games with modules whose jars are already present in the server installation), like it can be done in the game client from the “Select Modules” screen. In the current official version of Terasology, the code which handles download - and dependency resolution - of new modules is tightly coupled with it’s UI (the SelectModulesScreen class), so it took some days to refactor this part of the engine to separate the logic from the UI and making it accessible to external code (in FacadeServer). I opened a pull request in the engine repository with the changed code; with the engine patched in this way, it’s possible to access a ModuleInstallManager class, which provides method for pre-installation (dependency resolution) and installation of new modules, from the ModuleManager class which is registered in the root engine context during initialization. At the moment I’m working in the FacadeServer repository to bridge the HTTP/WebSocket server with the ModuleInstallManager to achieve the feature described above. -
week8
- 23 July
Various small improvements to both client and server
Since the latest blog update I worked both on the server and on the client. Here is a summary of the code written during this week.Server
- It’s now possible to rename existing savegames.
- The class which provides information about available modules when creating a new game, AvailableModulesResource, is no longer a proxy for the meta server but shows only the modules installed on the server and also provides information about the available world generators.
- All the server-side code described in this an the previous blog updates is on a new pull request.
Client
- There is a new screen with an animation which is shown when the client is trying to connect to the server, and if the connection fails the dialog which prompts for a server to connect to is shown again; this prevents the user to interact with carious controls before the connection is estabilished which could bring the user interface in an inconsistent state.
- It’s now possible to save addresses of favorite servers in the browser or device to avoid having to type them every time.
- In the dialog to create a new game, the world generator can now be chosen from a drop-down list (you no longer need to manually type the name). Also, the module list now only shows only the modules installed on the server; a separate panel to install/uninstall modules will be added later.
- Some parts have been refactored to improve the codebase (various TODOs have been removed) and the support for Android. This required an update of the ReactXP library to it’s latest version, which also introduced a small visual bug with text fields borders; I reported it and it should be fixed soon.
- Finally, I did some steps to allow authentication via an identity storage service, the feature is not available yet but it required to manually build two additional ReactXP controls.
-
week7
- 16 July
Added support for various interactions with savegames
In the previous update, I described how I implemented read-only access to the server’s savegame list; during this week, I added the possibility to interact with this resource. At the moment, it’s possible to perform these operations from the web interface or the web API:- Start and stop games - if a game is running, starting another one will automatically stop the running game, while manually stopping a game will bring the engine to an idle state until another game is started
- Add a new game, by specifying the title, seed, list of modules and world generator to use
- Delete an existing game
- Generate a backup of a game - useful before doing “dangerous” operations like adding or removing modules from an existing savegame, which will be implemented soon
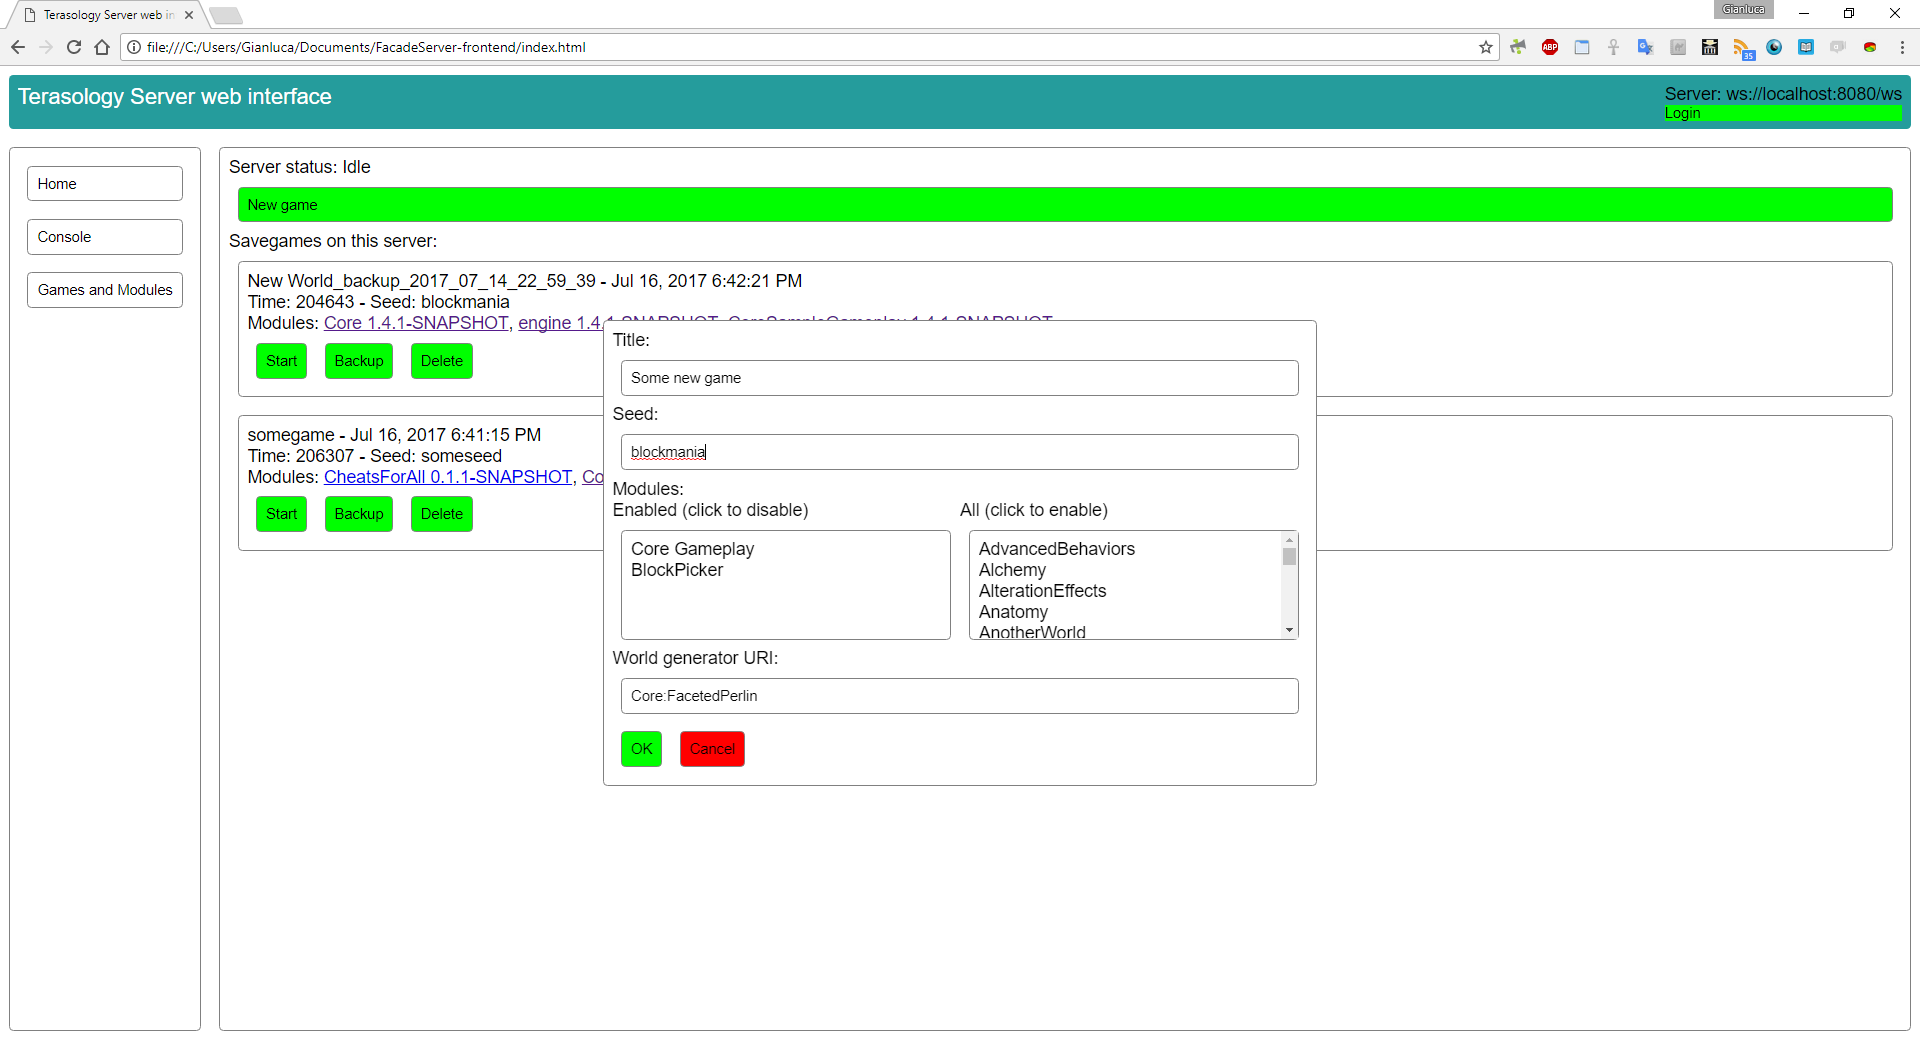
Here is a screenshot of the “New Game” dialog of the web frontend application:
As you may have noticed, the module dependencies are not resolved on the client side; in fact, for example, Core Gameplay depends on Terasology Engine, but the latter is not shown in the enabled modules list. The dependencies, at the momet, are resolved only on the server side when the user clicks OK; when the server builds the new game manifest, it adds all the necessary dependencies. A possible improvement could be to show the dependencies on the client side too, maybe together with a description for each module.
The available modules list (the right column in the new game dialog) is obtained from the meta server API; however, this can’t be done directly because the meta server at the moment does not support CORS so the game server is being used as a proxy (see the AvailableModulesResource class). To improve this hack that I put together to circumvent the no-CORS problem, there are two directions I can think of: the simplest could be to send a pull request to the meta server repository which adds a wildcard Access-Control-Allow-Origin header to the public API endpoints, thus making them accessible to any browser (in my understanding this shouldn’t be a security problem since it’s just public data); alternatively, however, AvailableModulesResource could be improved to not be a mere proxy but instead provide additional useful information, like the current availability of the module on the server.
At the moment, I’m working on implementing additional features to allow modification of existing savegames, more specifically renaming them and changing the module list. Another quite important feature on the to-do list is allowing an administrator to login with a password - set when the server is started - at the first run of a server; in fact, the addition of the Idle engine state has decoupled the existence of a running server from the existence of a savegame generated with the default options. In other words, it’s possible to start the server without generating the default game (using the -dontStartDefault command line switch) to manually configure the games using the web interface, but currently there is no way to actually access the web interface when a new server is started for the first time with that CLI argument, because the only way to login to the web interface is by using client identity certificates, which are generated when connecting to the server through a regular Terasology client - which is not possible when the server is not running any game yet. -
week6
- 9 July
Implemented read-only access to savegames and modules
At the end of the previous update, I mentioned that the next goal was to allow to work with the server configuration from the API/web interface. Here are some relevant points that must be taken in consideration to implement this feature:- A key feature of Terasology is modularity, so the web interface should allow server administrators to add/remove or enable/disable the gameplay modules.
- A Terasology instance can manage multiple savegames (though only one is running at a given moment), each of them with potentially different sets of modules enabled. At the moment, this is mostly used in the “client” mode, where a user can have various single-player savegames; the headless server implementation (see StateHeadlessSetup.java) creates a single savegame with a certain module list, which can be customized by editing the configuration file.
- To enable or disable modules on a certain savegame, that game must not be running. Also, usually the module list is set when the game is created and then left unchanged; I still have to investigate whether it’s possible to add or remove modules on an existing savegame, it probably depends on the module.
- The permission system is internal to each savegame, i.e. a client identified by a certain client ID can have different permissions in different games and there isn’t a “global” permission system.
These considerations led me to the following conclusions:
- Two different resources should be added, one to manage the various savegames and their modules (I’m working on this one at the moment) and one to manage “global” server settings (such as the network port).
- A new engine state which is not running any game is required to allow the server administrator(s) to configure modules for each game. When the engine is in this state, the administrator can create one or more games in the web interface and choose one to run.
- To determine whether a client is a server administrator, a list of the client IDs allowed to perform these restricted task could be saved in a file in the server data directory.
- A command line switch can be used to tell the server if, at first startup, it should generate a game with the default modules or wait for a connection from the web interface to let the administrator manually configure the game, then start it. In a similar way, another command line argument should allow to select which game sould be started automatically if there are multiple ones.
- To allow the administrator to configure a game on the first startup, an additional authentication method needs to be added. In fact, on the first startup, there are no client identities stored in the server configuration file, because they are generated when an user connects through a normal client (not the web application). A simple solution could be to specify a password on the command line
or as an environment variable when starting the server instance for the first time, which could then be entered in the web interface.
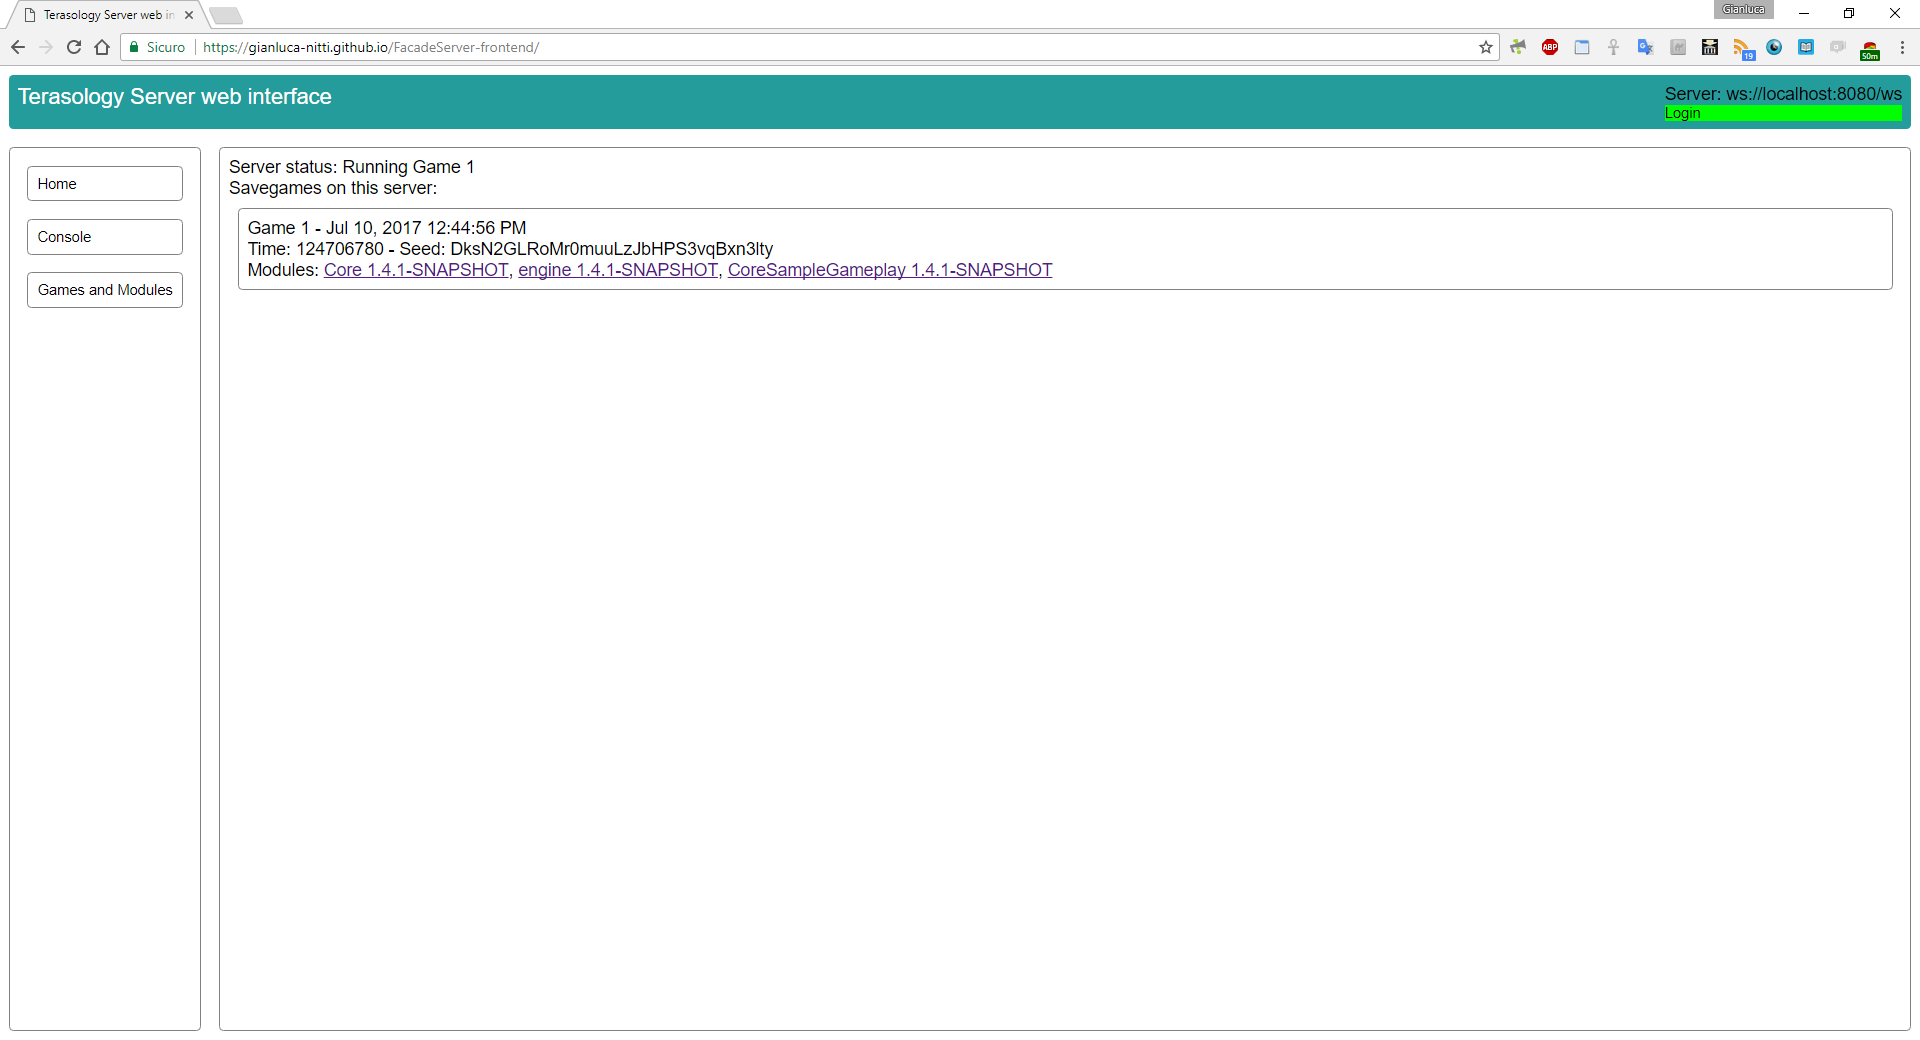
At the moment, I implemented read-only access to the server status and the game list with module information (both the server-side, on the new games-resource branch, and the client-side, in the frontend repository). For each module, there is a link to its meta server page. Here is a screenshot:
The next goal is to provide write access (creating new games, selecting modules, stopping a game and running another one), restricted to server administrators, as described above.- 6 July
Completed client side authentication
I’m writing this short DevBlog update to confirm that I finally managed to get the client side authentication code to work. All the relevant code is in the latest commits pushed to the frontend repository. To achieve this goal I used the jsrsasign and jsbn libraries to perform the RSA signature of the handshake message expected by the authentication protocol. At the moment, the public and private certificates can only be supplied by pasting the whole game client configuration file in the web interface; in the upcoming weeks I plan to add support to authentication based on identity storage service and maybe an option to store the certificates in the browser’s localStorage to avoid having to authenticate every time the page is loaded.
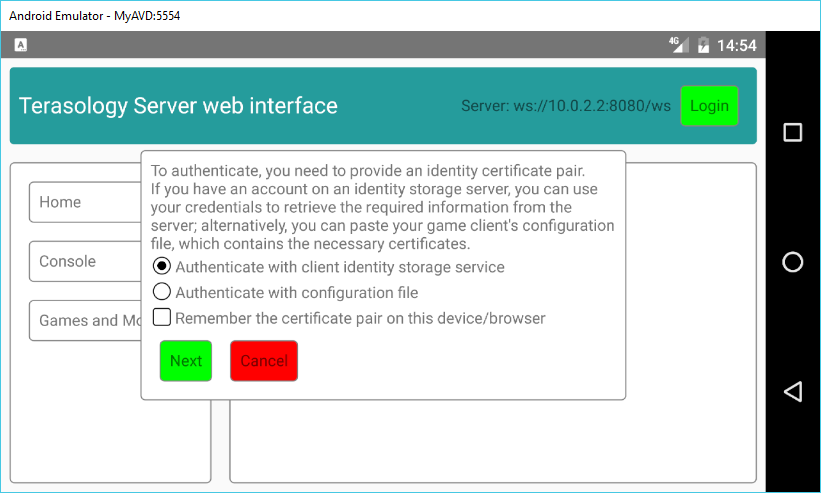
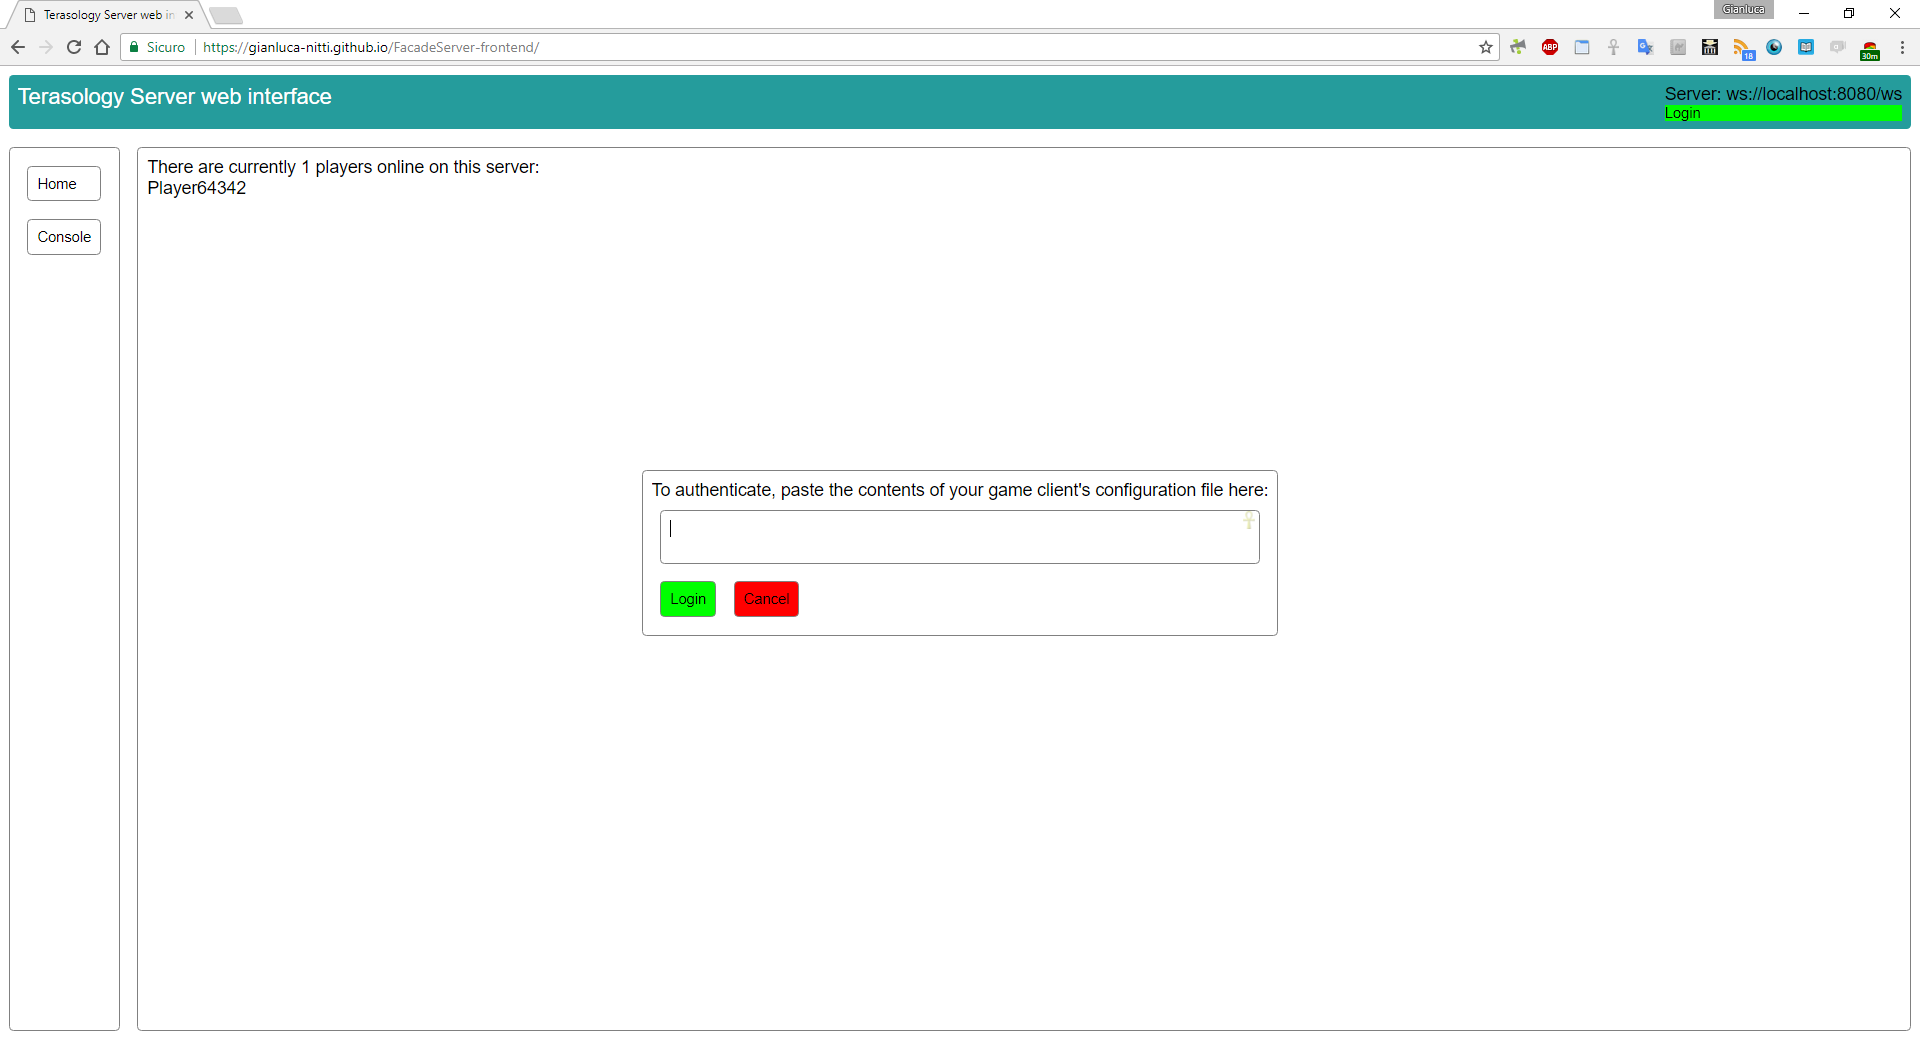
Here is a screenshot of the authentication UI:
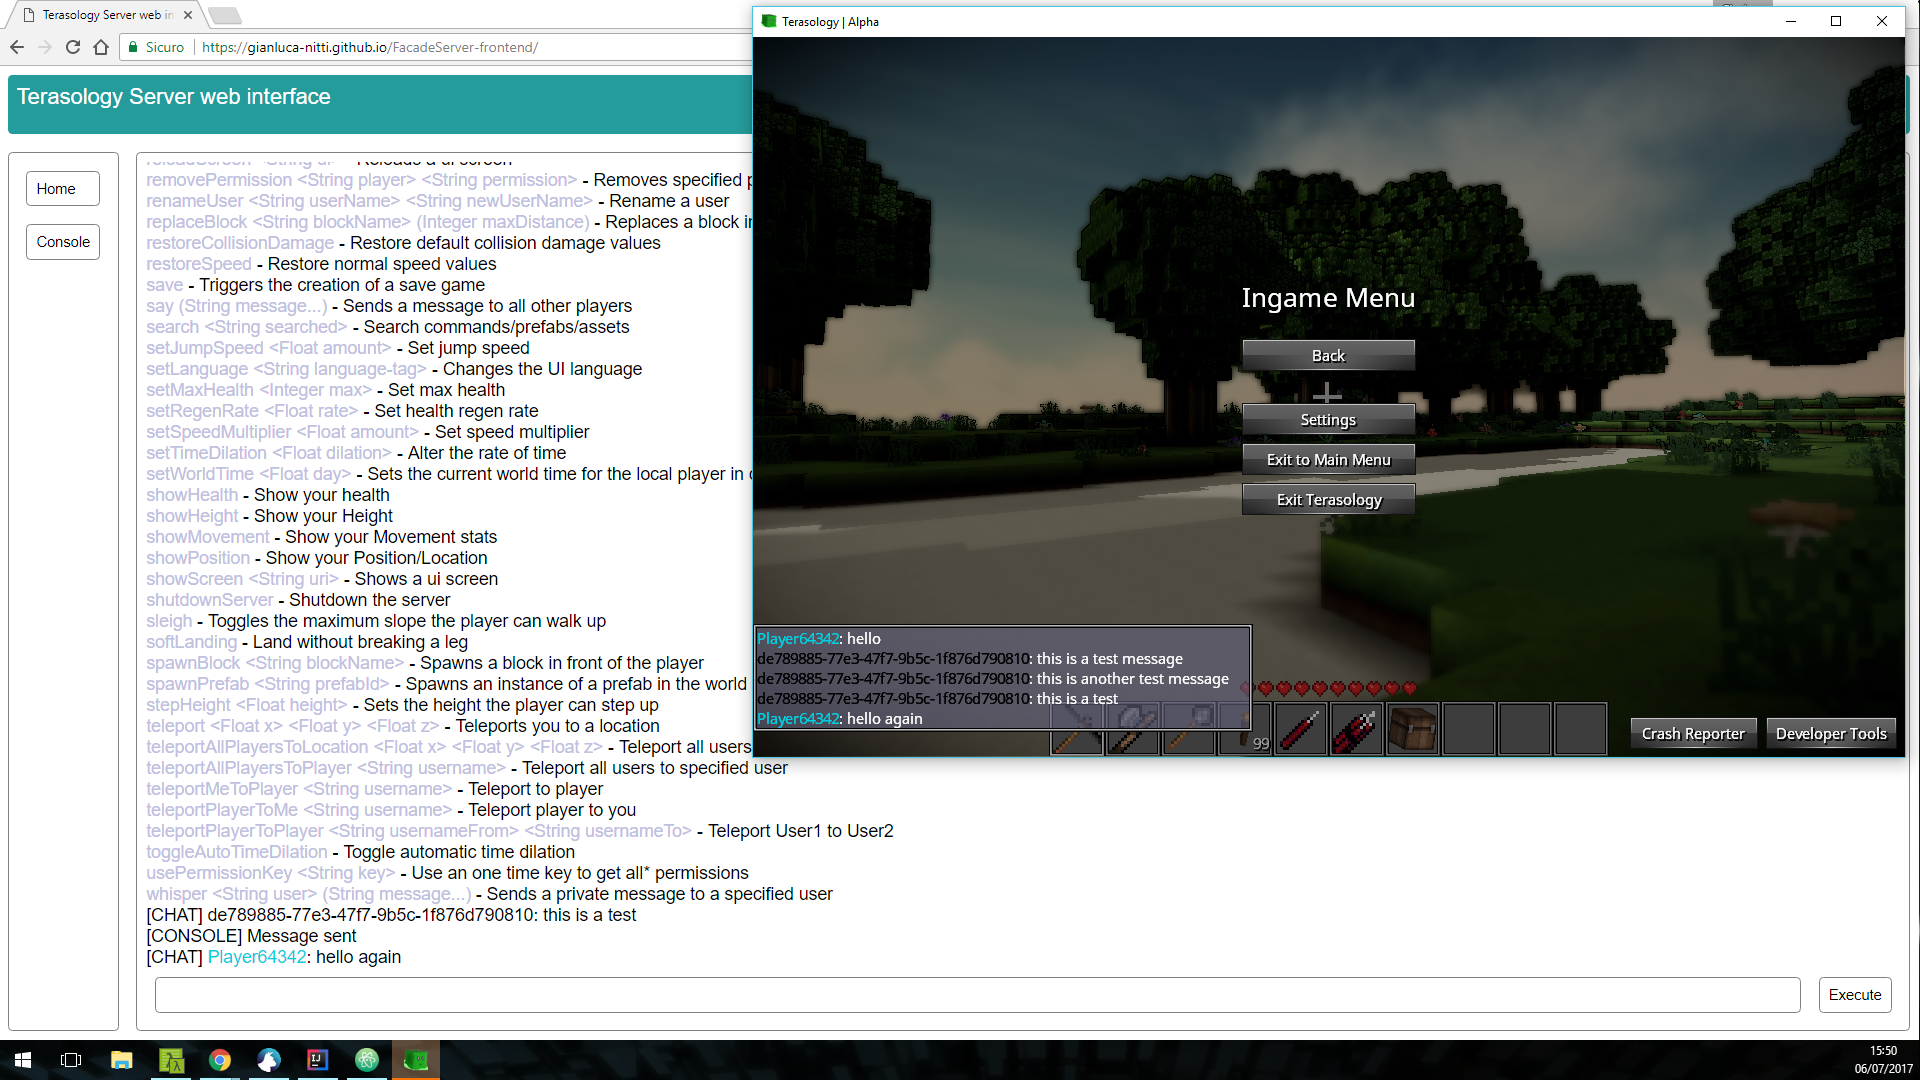
The working authentication code makes it possible to execute console commands; in the following screenshot, for example, thehelpcommand is used to obtain a list of the available commands, then thesaycommand is used to send a couple of chat messages. As you can see, the text colors are supported too.
As you may have noticed from these two screenshots, the web application is now being deployed to GitHub Pages, so you can always run the latest working version (the Travis-CI service is set to automatically deploy the working builds) by visiting https://gianluca-nitti.github.io/FacadeServer-frontend/.
At the moment, I’m working on adding access to server’s configuration to FacadeServer and to the client. -
week5
- 2 July
Working on the client-side authentication code
During the last week I continued focusing on the frontend application. First of all, I did some quite heavy refactoring/restyling of the code written during the previous week. This took a couple of days but I think it was necessary, because it was starting to get messy so I learnt about some TypeScript best practices, improved the modularization of the code in different files and set up tslint - a TypeScript linter, similar to Checkstyle for java. Also, I set up Travis-based continuous integration for the project, which at every commit compiles the TypeScript code and checks for tslint rule violations. I then started building the authentication system, which will allow users of the web/mobile interface to identify themselves against the game server by providing the identity certificates (either by pasting the JSON configuration file of the regular game client, or using the clientidentity storage service). Unfortunately, I understimated the effort necessary to implement this functionality; since I already built a very simple proof-of-concept authentication client in Javascript some weeks ago I thought I simply had to integrate it in the project, however I didn’t take in consideration that for simplicity I built it around the configuration format used by the identity storage service. The difference between this format and the one used in the regular game client configuration file is that the former stores the BigIntegers as base64 JSON strings, while the latter as regular JSON numbers. Turns out that parsing a JSON containing large numbers (necessary to allow the config-file based authentication method) in Javascript/TypeScript is a bit painful because the standard parser does not support them; so, I tried a couple of libraries but I hit limitations that made them unsuitable. At the moment I think that a nice way to implement a solution is to use JSON-js and manually customize the parser to convert the large numbers to base64 or hexadecimal strings (which can then be fed to the node-rsa cryptography library), and I’m working on it.
By the way, I was notified that I passed the first GSoC evaluation. I’m very happy of this and I thank my mentors, the MovingBlocks community in general and Google for supporting this and other projects and for the feedback they are providing. -
week4
- 26 June
First frontend steps
Since the previous update I’ve been working with client-side code, to begin building a user-friendly frontend to the terasology server API; it lives in this repository. Unfortunately I had to slow down a bit to choose a proper framework and take familiarity with it, but I think I found a very promising solution. The framework I’m using is ReactXP, a MIT-licensed solution from Microsoft which allows to build truly cross-platform applications with a single codebase; it’s an additional abstraction layer built on top of Facebook’s React and React Native which allows to build a web application and native (i.e. not WebView-wrapped like in Cordova) mobile applications for the major platfroms in a single shot. Moreover, it’s written in and integrates well with Typescript, a typed language that compiles to Javascript; I already used it before and it “feels” more like Java than Javascript - has classes, interfaces, type parameters and various other features that in my opinion are useful and make the coding process less error-prone.
Here is a screenshot of the actual state of the frontend application, in the web version running in a desktop browser:As you can see, I’m going to organize the interface in tabs which can be swithed using the menu on the left (which I should probably make a popup when the viewport is under a certain width, to avoid taking too much space on mobile devices in portrait orientation), to access different resources such as console, configuration, etc; at the moment, there are a console tab and a home tab that shows a list of the connected players. All the updates are received in real-time thanks to WebSocket. At the moment, the client connects in anonymous mode and thus is read-only (i.e. it’s not possible to run console commands), and adding the code to perform authentication - by pasting the JSON client configuration or logging in to an identity storage service account - is my next goal. Should be quite simple since it will mostly consist in tidying up the code I already written for testing and integrating it in the frontend.
- 22 June
Implemented read-only anonymous access to resources and improved error handling
As said at the end of the previous post, in the last few days I wrote the code to allow unauthenticated clients to get read-only access to some resources. So, for example, a list of the currently online players on the server can be obtained by simply sending an HTTP GET request tohttp://server-address/http/resources/onlinePlayersand you’ll get a JSON array containing the player list, without having to perform the authentication process which would involve identifying with a client identity certificate with a few more requests which, if the identity is correctly verified, would provide the client with the token to perform authenticated requests. Obviously, this is still necessary to perform actions which have effects on the server, for example running console commands, but since there are informations (like, as said, connected players, server metadata, etc) which can be made publicly available I thought that allowing anonymous access to them was handy.
The example above uses HTTP, but access via WebSocket is available as well. In this case, once a WebSocket client is connected, it will immediately start receiving “public” events (like notifications when a player connects) and is allowed to perform read requests to resources. Then, it can perform authentication at any time to obtain write access and subscribe to “private” notifications (like chat messages sent - or “whispered” - only to the player identified by the client identity that the WebSocket client used to authenticate).
A limitation is that event notifications for anonymous clients (for example public chat messages) are available via WebSocket but not via HTTP. This is because for HTTP, events are put in a per-client queue which is emptied when the client requests a certain endpoint to receive the pending events which happened since the previous request; this is possible for authenticated clients which are identified by a secret session token and thus are the only ones that can empty their queue, but not for anonymous clients. For example, we can consider the following situation: there are two anonymous clients,AandB, which query the event endpoint every 5 seconds.Astarts querying it and is notified of an eventXand plans to repeat the request after 5 seconds; a second later an eventYhappens andBrequests the event queue:Bis notified ofY, but also empties the queue, which means thatAwon’t aknowledgeY. Thus, it wouldn’t make sense to have a publicly shared event queue managed in this way because not all clients would be notified of all events. If this feature is necessary or useful, I could later consider alternative ways of implementing it, for example keeping a fixed number of recent events in the public queue and avoid emptying it on each request.
All the code is on theresourcesbranch, which is now the Pull Request #3 (by the way, PR #2 has been recently merged). At the moment, my focus is to start the development a browser-based frontend with basic functionality (like showing connected players list, allowing authentication and console usage). -
week3
- 18 June
Implemented resource management
Since the latest update I mainly worked on the code to provide access to certain resources to WebSocket and HTTP clients; the code is on the resources branch. Here is a class diagram showing the architecture of the interfaces and classes which represent resources, together with the Console resource (the only one available at the moment):Some notes:
- The Resource interface simply states that a class implementing it is a resource and must provide a name.
- Then there are three main families of resources: WritableResource, ReadableResource and EventEmittingResource. As you can easily guess by the names, they define the methods that a resource must implement if it accepts data to be written to it, if it can provide data “on-demand” and if it emits events. The latest one is a class instead of an interface, because it implements internally the logic to register observers and notifying them.
- All the three kinds of resources are typed, i.e. a ReadableResource has a type parameter which determines the class of the objects which are obtained when reading this resource. WritableResource also has a method to get the Class object representing the type, which is necessary to deserialize client messages.
- The clients are identified by the same EntityRef objects which identify them in the engine.
- While EventEmittingResource and ObservableReadableResource look very similar, there are key differences between them. An EventEmittingResource produces data only by raising events, and can’t be queried directly; the ObservableReadableResource class is an addition to a ReadableResource (which can be read “on-demand”) that allows the subclasses to notify clients when the data has changed. At the data transport level, the server sends to WebSocket clients both the events generated by EventEmittingResources and the updates from ObservableReadableResources; for HTTP clients, the server can’t directly send data to clients, so events are saved in a queue that the client can query by periodically sending a GET request to a certain endpoint, while there is no “update queue” for ObservableReadableResources (it wouldn’t make sense to store, for example, all the changes to the number of connected users, which could be an ObservableReadableResource<Integer>); the client can simply send GET requests to periodically read the resource of interest to always obtain the latest value.
- (Not shown in the diagram) There is then a ResourceManager class which works as a registry of the instances of the resources and provides methods to access them according to their capabilities. The ResourceManager is used by the JsonSession class - which in turn is used by the classes which implement the WebSocket and HTTP protocols - to query or perform actions on the resources when requested by clients, or when a resource sends a notification.
- At the moment I implemented a ConsoleResource; clients can write strings (commands to be executed) to it and receive MessageEvents for each message that the server writes to the console.
- The simple WebSocket client has also been updated to keep compatibility with the backend changes; now, it also allows to send messages to query resources and it shows the received messages/events. Here is a screenshot showing the execution of a console command (the help command). There are still some character encoding issues - I guess the problem is in the serialization of MessageEvents - which will be fixed later.
The next goals are allowing anonymous (without authentication) access to certain ReadableResources which will be developed, for example server information resources (connected players, MOTD, …), and starting to work on the “real” web frontend.
- 13 June
A couple of words about HTTP and WebSocket
Until now, I talked about WebSocket, HTTP and used the generic term “web API” without going into much detail; probably, it’s time (maybe a bit late) to clearly explain on this site what king of interface will be available to externally access a Terasology server running inside FacadeServer.- The idea, as I mentioned in the GSoC proposal, is that the scenario where an user is connected to a Terasology server through a web application (which will be developed during the next weeks/months) is potentially an higly interactive environment suited for “push”-style notifications from the server to the client. For example when a new chat message (perhaps sent by another user connected through a regular Terasology client) is received by the server, the server must “send” (quotes since it can look unfamiliar if you are used to the “traditional” style of a web server only answering requests sent by clients) it to the client connected through the web interface.
- Until some years ago, this would have been possible only by having the client to periodically poll the server for updates. Nowadays, however, all the major browsers support WebSocket, a protocol much more suited for real-time bidirectional communication than regular HTTP.
- Providing only a WebSocket-based interface to the server, however, would be probably a little restrictive. One of the goals of the project is to provide an Application Programming Interface to allow arbitrary software to interact with a Terasology server (the other one is to provide a browser-based user friendly interface to it as described above); as a very simple example, one may want to retrieve the number of connected players from a shell script. Doing something like this via WebSocket would be cumbersome, if possible at all; you’d have to use a command line WebSocket client like wscat and in some way configure it to send a certain message to ask the server the required piece of information and wait for the server to answer. A much better way to accomplish a goal like this would be to have HTTP endpoints exposed by the server and querying them with curl.
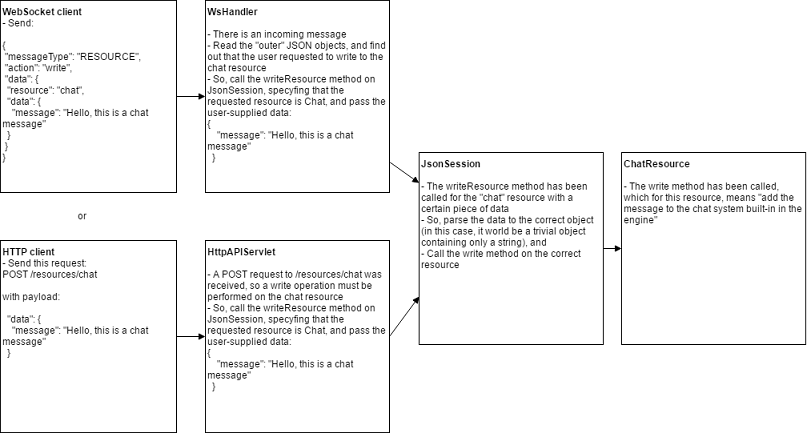
- So, in the optimal setup, the server should expose both a WebSocket and a standard HTTP interface. In my understanding, this can be accomplished quite well by abstracting, in the server architecture, the accessible resources from the communication protocol. The JsonSession class handles the object serialization/deserialization with the JSON data format, but is not aware of the transfer protocol; other classes, WsHandler for WebSocket and HttpAPIServlet - added yesterday - for HTTP, work as a bridge between the transfer protocol and method calls to JsonSession instances. At the moment only the authentication handshake is handled, but this structure is designed to provide access to any resource, too, regardless of the used protocol. A request from the client to the server will result in a method of JsonSession being called and the returned object to be sent as the response, while an event generated by a resource would be notified by the JsonSession - using the Observer Pattern - to the appropriate handler and sent to the client by directly sending a message (if WebSocket) or by enqueuing it in a buffer that the user can read by requesting a certain endpoint (if HTTP).
- A diagram can probably express the concept better. Maybe this is not the best example since sending a chat message is an action that doesn’t need to be answered with data, but I think it still shows the main idea for handling requests from both the protocols:
- I implemented the HTTP interface to the authentication system. When the client initiates the handshake, a session token is generated and sent to the client; all the further requests must use that token in an HTTP header so that the server can verify the client’s identity. Code is in the HttpAPIServlet class.
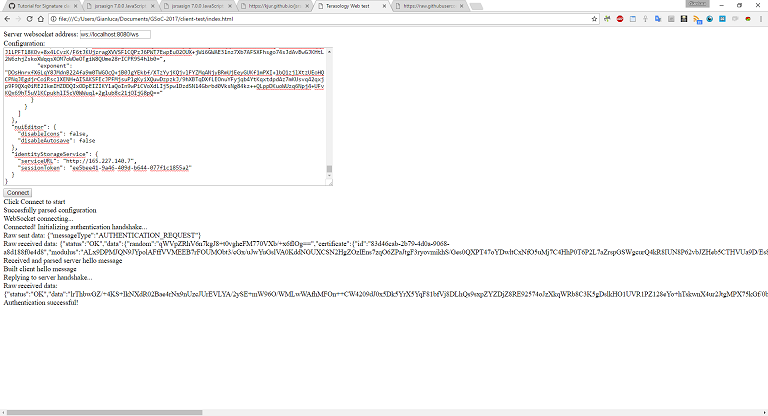
- Then, I made a small proof-of-concept Javascript client which authenticates with a server using WebSocket. This is mainly to show that it’s possible to do the cryptography part (signing the verification data) in a browser, with the help of a library like jsrsasign. A problem I encountered is that it’s not simple to deserialize a “normal” configuration file as it’s saved by a Terasology client because of the big integers used in certificates. Looks like it’s not possible with the vanilla JSON.parse() but it’s necessary to use external libraries like json-bigint, but this should not be much of a problem since the real front-end client will most likely use browserify to manage browser-side libraries and thus easily support NPM modules such as json-bigint. For now, this very simple client only accepts a configuartion where the BigIntegers are serialized as the base64 of their binary representation, as in the client identity storage service.
I posted the code (single file) as a gist, and here is a screenshot:
-
week2
- 11 June
Completed authentication handler
I think that the authentication handling code can now be considered completed. Since the last update I:- Added an HeadlessClient class, which extends the AbstractClient class defined in the engine and has the puropse to represent clients connected via the web-based API; it is instantiated as soon as the authentication is completed. By using certain helper methods already present in AbstractClient, HeadlessClient will take care of registering these clients with the engine’s entity manager. This is necessary to allow the clients to actually interact with the engine, for example to be notified of events, like chat or console messages.
- Improved the previously written code to manage the authentication handshake to send a server verification signature (a piece of data already known by both the client and the server signed with the server private certificate) upon succesfull authentication of the client, to allow the client to optionally verify the server’s identity using the server public certificate and optionally disconnect if the verification fails. I added this since the same action is made during the authentication of real clients.
- 8 June
Progress on client authentication via WebSocket
Since the latest update I’ve been working mainly on this branch.- The authentication scheme used for the web-based (or, more generically, external) clients is similar to the one already used to authenticate regular Terasology clients on a Terasology engine, and it’s based on signing the initial handshake messages with asymmetric cryptography; the appropriate public and private keys are stored in each peer’s (client or server) configuration file.
- Summing up, the new code contains a class that can be used to perform an authentication handshake, like the one implemented in the engine to handle connections from regular game clients, but not tied to a specific transfer protocol (TCP via Netty in the engine) or a data serialization format (Protobuf in the engine codebase).
- This class is then used by code which encapsulates a client-server communication based on the JSON data format; at the moment, this supports the authentication handshake (delegated, with proper serialization and deserialization, to the previously presented class) and will later be extended to manage requests and notifications to allow the clients to interact with the engine once authenticated.
- The final layer implements the communication protocol. At the moment, a simple WebSocket-based interface has been set up; it (sorry if this sounds repetitive) handles, at the moment, the authentication handshake, will be improved to handle requests (in the most general sense of the term, they could be status queries as well as action requests) from clients about the running engine and to send “live” server-to-client updates.
-
week1
- 5 June
Connect FacadeServer to the Terasology engine
Today I opened the first pull request on FacadeServer, the main repository where my GSoC code is going to be stored. The proposed code connects the codebase, which is actually a Jetty-based webserver, with the main Terasology engine, and runs it in headless (or server) mode (on the main thread), while, at the seme moment, it continues to listen and answer for HTTP and WebSocket connections on the threads spawned by Jetty.
A more detailed explanation of the work done is available in the pull request’s description, at the link above.
The next goal is to set up the authentication protocol and code to allow the server to identify clients connecting via HTTP/WebSocket according to the game server configuration.- 2 June
First days report
Improved and completed the Terasology identity storage service, a sub-project I started earlier which consists of a web service to store the Terasology client identities and synchronize them across clients. This is useful if you have multiple computers, and will make the authentication for the web interface to the Terasology servers which I’ll build as part of the GSoC more user-friendly. Here is a short video showing the functionality:
